
Cover your front door, back or side doors, driveway, garage, and any ground-floor window out of street view before you touch a second-story angle. Mount outdoor cameras roughly 8 to 10 feet up, indoor units 7 to 8 feet, and angle every lens to catch faces, not hats. Test Wi-Fi signal and night vision before you drill a single hole.
TL;DR:
- Mount outdoor cameras at 8 to 10 feet for facial clarity and tamper resistance, with indoor units ideally placed at 7 to 8 feet.
- Overlap camera fields of view by 10 to 20% to prevent blind spots, and verify coverage with live testing before final installation.
- Prioritize entry points such as doors and driveways, capturing faces and license plates where possible, with specialized cameras for each zone.
- Avoid common mistakes like IR glare from soffits, aiming cameras at windows or the sun, and mounting too high for facial recognition.
- Regularly maintain the system by checking angles, signal strength, and firmware, and consider professional assessment for larger or high-value properties.
Table of Contents
- Where Should You Put Security Cameras First?
- How High Should You Mount a CCTV Camera?
- How Do You Avoid Blind Spots Between Cameras?
- What Are the Most Common CCTV Placement Mistakes?
- How Do You Test a CCTV Camera Before Final Mounting?
- Which Camera Type Fits Which Zone?
- How Often Should You Maintain Your CCTV System?
- When Does a Property Need a Professional Security Assessment?
- What Do Installers Get Wrong on Older Homes and Remodels?
- Get Professional Help With CCTV Placement and Monitoring
- Sources
Where Should You Put Security Cameras First?
Start with the doors. More than a third of burglars come through the front or back door, which makes those two points your highest-value real estate for any camera budget. Everything else on this list matters, but nothing outranks entry points.
- Front door: Mount cameras at a height and angle that capture a visitor’s face before they reach the threshold, rather than just the top of their head. A video doorbell at standard doorbell height works well here because it captures faces at eye level during the actual approach.
- Back and side doors: These get less foot traffic and more attention from anyone casing a property, since they’re hidden from the street. Cover the door itself and the fence line or gate someone would use to reach it.
- Driveway and garage: Aim for an angle that captures license plates as vehicles enter, and consider a spotlight camera here. A porch light that snaps on when a car pulls in does more deterrence work than people expect, and visible cameras alone can discourage up to two-thirds of prowlers scouting a property.
- Ground-floor windows: Off-street windows deserve a camera even when they’re not near a door. Mount exterior units away from direct glass reflection, or place a camera indoors facing out if outdoor mounting risks glare.
- Yard corners and perimeter: Corner mounts let one camera watch two sides of a house at once, which is the cheapest way to add coverage without adding cameras.
- Indoor entry points and hallways: Place cameras in room corners, never facing a window or bright doorway, to avoid the backlighting that turns every visitor into a silhouette.
How High Should You Mount a CCTV Camera?
Height and tilt decide whether your footage is useful evidence or a blurry shape nobody can identify. Mount too low and someone can grab the camera. Mount too high and you lose the facial detail that actually helps identify a person.
Reviewers who’ve tested dozens of installs consistently land on the same numbers: outdoor cameras belong around 8 to 10 feet, balancing tamper resistance against facial clarity, while indoor corner mounts work best at 7 to 8 feet. Go beyond about 12 feet outdoors and most consumer-grade lenses can no longer resolve a face clearly enough to be useful, no matter how sharp the sensor’s marketing claims.
| Mounting scenario | Height range | Tilt angle | What it delivers |
|---|---|---|---|
| Outdoor entry point (door, gate) | 8–10 ft | 15–20° down | Facial detail at close range |
| Outdoor wide coverage (yard, perimeter) | 8 to 10 feet | about 20° down | Broader overview, less facial detail |
| Driveway/plate capture | 7 to 8 feet | about 20° down | Plate legibility at vehicle speed |
| Indoor corner | 7–8 ft | about 20° down | Room-wide coverage, minimal blind spots |
If you need overview coverage from a higher mount, you need more resolution to compensate. A 2-megapixel camera mounted at 12 feet will barely give you a usable face at 15 feet of distance. A 4K unit at the same height still delivers identifiable detail well past that range.
How Do You Avoid Blind Spots Between Cameras?
Field of view, or FOV, is simply how wide a slice of the scene a lens can see, and it’s set mostly by focal length: a wide-angle lens sees more but with less detail per object, while a narrow lens sees less but with sharper detail at distance.
The fix for blind spots isn’t more cameras everywhere. It’s deliberate overlap.
- Aim for 10 to 20% overlap between adjacent camera fields, a rule installers use to guarantee no gap forms as equipment ages or shifts slightly over time.
- For a small yard, a two-camera pattern covering diagonal corners usually eliminates the dead zone a single wide-angle unit leaves behind a tree or fence post.
- For a medium property, a three-camera pattern (front door, driveway, one rear corner) with overlapping cones typically closes gaps a two-camera setup misses.
- Sketch a simple site map, even a rough one on paper, and draw each camera’s cone of view before you mount anything. It takes ten minutes and saves a return trip up the ladder.
- Before drilling, hold each camera in place and check the live view on your phone. What looks perfectly angled from the ground often reveals a blind corner once you’re actually looking through the lens.
What Are the Most Common CCTV Placement Mistakes?
Most bad footage doesn’t come from a bad camera. It comes from a placement mistake that was avoidable.
- IR glare under deep soffits. Infrared light bouncing off an overhang a few inches away washes out the whole frame at night. Fix it with a standoff bracket that pulls the camera away from the surface, or move it to a mount without an overhang above the lens.
- Aiming toward windows or the sun. A camera facing a window, or one that stares into direct morning or evening sun, will blow out its own footage. Reposition it, or accept an indoor placement instead of forcing an outdoor angle that fights the light.
- Wi-Fi dead zones. A camera that can’t hold a signal drops clips and misses events entirely. If your router signal is weak at the mounting point, run a wired PoE connection, add a mesh extender, or relocate the access point before you relocate the camera.
- Mounting too high “for safety.” Past roughly 12 feet, most cameras lose the facial resolution that makes footage useful. If height is unavoidable due to a two-story wall, upgrade to a higher-resolution unit to compensate.
- Recording beyond your property line. Pointing a camera at a neighbor’s yard or window creates real privacy exposure. Use masking zones in the camera’s software to blank out areas you don’t need, and check your local surveillance guidance if you’re unsure where the line sits in your area.
Pro Tip: Before you commit to a mounting hole, zip-tie the camera to a broom handle or ladder and hold it at the intended spot for a night. Check the recorded footage the next morning. It’s the cheapest test you’ll ever run.
How Do You Test a CCTV Camera Before Final Mounting?
A five-step walk-through catches nearly every placement error before it becomes permanent.
- Temporary mount and sightline check. Hold or loosely tape the camera at the planned spot and confirm the live view shows what you actually need, not what you assumed you’d see.
- Verify signal strength. Check Wi-Fi throughput at that exact point, or confirm your PoE cable run reaches the switch without a voltage drop.
- Set motion zones. Draw detection zones that exclude the street, a neighbor’s driveway, or a swaying tree branch, since poorly tuned zones are the number one cause of false alerts.
- Run a night-vision test. Record after dark and review it for washout, reflection, or a glare spot you didn’t notice in daylight.
- Document the setup. Log each camera’s location, height, and angle, and set a reminder to retest quarterly. A well-planned single-family home install typically lands somewhere around 4 to 6 cameras total to cover every entry point without redundant overlap.
Which Camera Type Fits Which Zone?
Placement only works if the hardware matches the job. A camera built for one zone often underperforms badly in another.
- Video doorbells excel at the front entrance, combining two-way audio with a mounting height around 48 inches, right where a visitor’s face naturally lands in frame.
- Bullet cameras are the right call for driveways and long yard sightlines, since their narrower field of view holds detail at distance well enough for plate capture.
- Dome cameras suit indoor corners and covered porches; their housings resist tampering better than exposed bullet units, which matters in high-traffic commercial spaces.
- PTZ (pan-tilt-zoom) cameras can replace several fixed units when someone is actively monitoring or an automated patrol pattern is set up, but they need that active management to earn their higher cost.
- Spotlight and color night-vision models trade some low-light detail for a strong deterrent effect. An IR-only camera captures a clean black-and-white face; a spotlight model announces itself and often keeps someone from approaching at all. Different jobs. Camera types match zones in predictable ways once you know what each one is built for.
How Often Should You Maintain Your CCTV System?
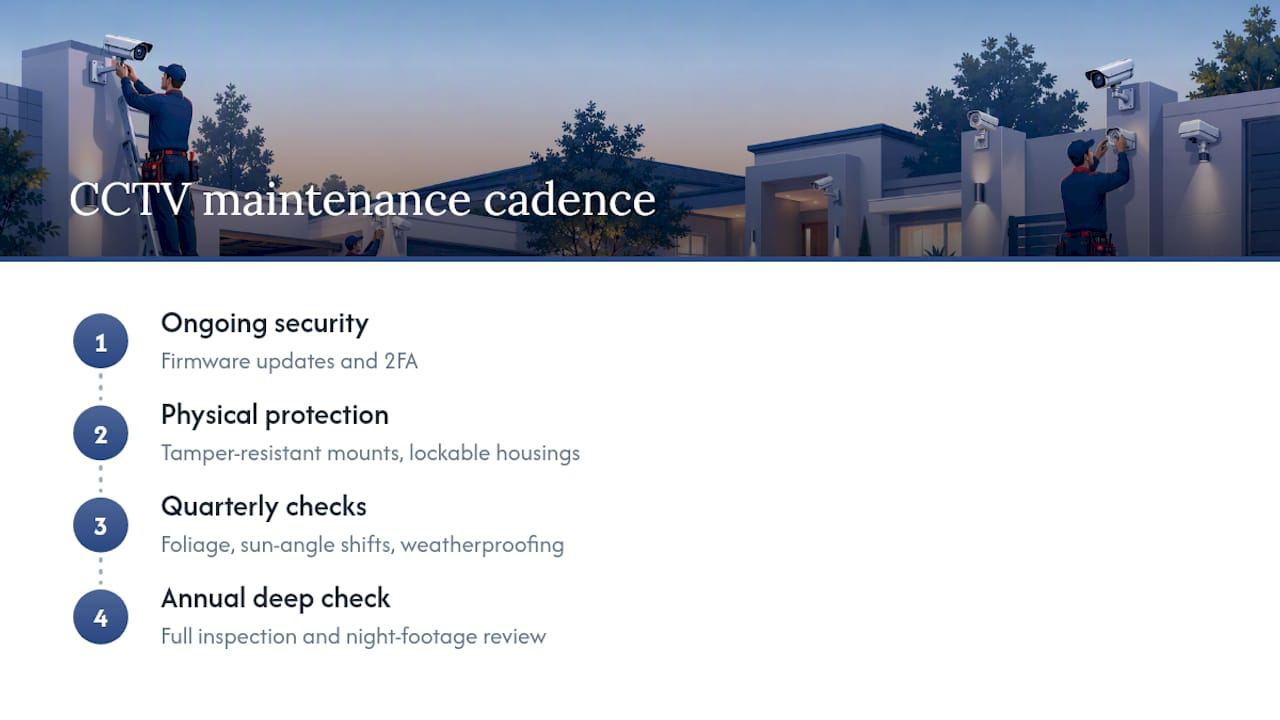
Placement isn’t a one-time decision. A camera that was perfectly positioned in April can be half-blocked by August growth. Use tamper-resistant mounts and lockable housings on anything within reach. Keep firmware current and enable two-factor authentication on every camera account, since account compromise is a growing risk vector. Check quarterly for foliage creep, seasonal sun-angle shifts, and any weatherproofing wear, and run a full deep check annually, including a rewatch of night footage from each unit.
When Does a Property Need a Professional Security Assessment?
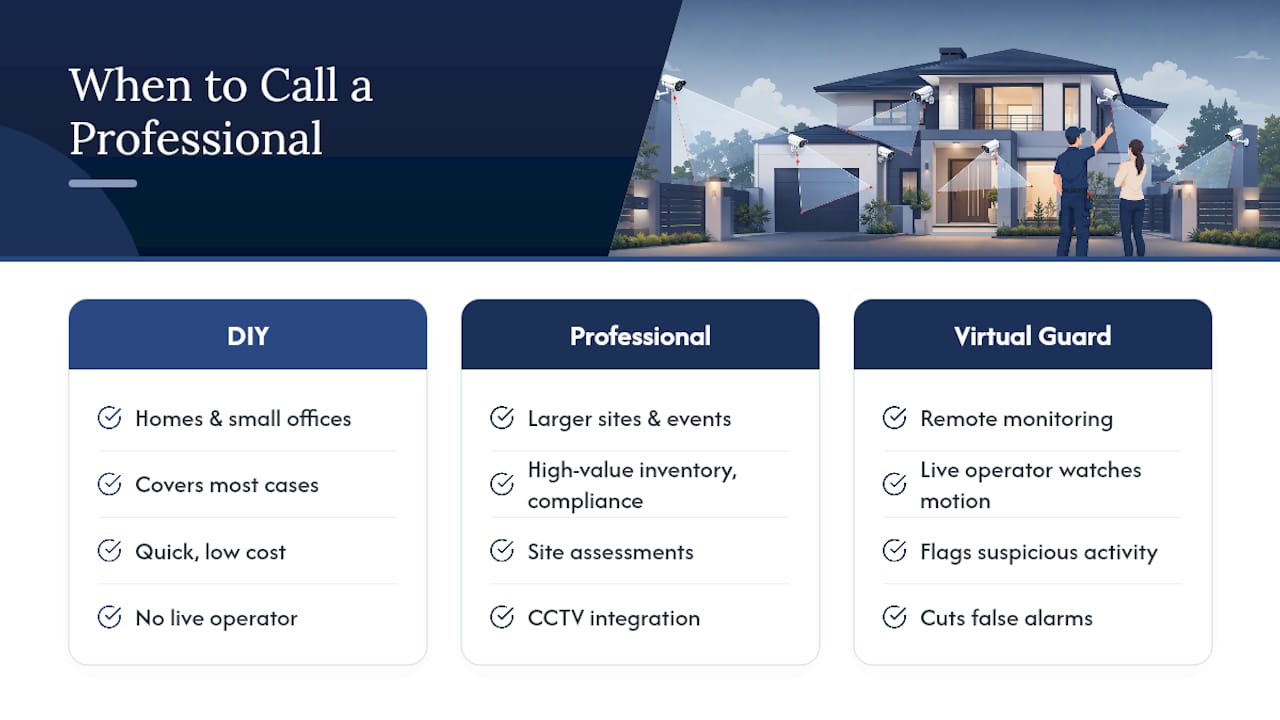
DIY placement covers most homes and small offices well. Larger sites, high-value inventory, event security, or anything touching regulatory compliance usually call for a trained eye. Gsgicorp’s teams, built from law enforcement and military backgrounds, run site assessments and CCTV integration projects that catch coverage gaps a homeowner’s walk-through misses. Remote monitoring through Virtual Guard adds a layer DIY setups can’t match: a live operator watching flagged motion, which cuts false-alarm callouts and shortens real response time when something actually happens.
What Do Installers Get Wrong on Older Homes and Remodels?
Older homes and mid-remodel properties trip up even careful installers. Deep original soffits cause IR bounce nobody anticipates until the first night recording. Additions change sightlines a previous camera plan never accounted for.
The single highest-impact habit: mount temporarily and check live view before you commit to a drilled hole. It costs ten minutes and prevents a redo. Readers who’d rather skip the trial and error can have Gsgicorp’s guard services team handle both the assessment and the install.
— Alston
Get Professional Help With CCTV Placement and Monitoring
Gsgicorp turns the placement rules in this guide into an installed, monitored system, without the trial-and-error of figuring out mounting heights and blind spots on your own. Where a DIY setup leaves you checking footage after the fact, CCTV integration from Gsgicorp pairs professional site assessment with ongoing maintenance, so coverage gaps get caught before they become a problem instead of after.

Complex sites, high-value assets, and anything with regulatory exposure benefit from more than a weekend install. That’s where Virtual Guard remote monitoring and on-site guard services come in, giving a live operator eyes on flagged activity around the clock. If your property spans multiple entry points, a commercial lot, or an executive residence, request a site assessment through Gsgicorp’s services page and get a placement plan built by people who’ve done this for a living.
Sources
The mounting heights, entry-point statistics, and overlap guidance in this guide draw from installer-tested field data rather than manufacturer marketing. Safewise’s placement research covers entry-point burglary patterns and deterrence rates. CNET’s hands-on mounting tests inform the height and angle ranges used throughout. Overlap and coverage-pattern guidance comes from the placement guide at PVR Blog, while testing checklists reference The Independent’s installation advice. For lighting specifics in poorly lit driveways, BeyondSensor’s vertical-lux guide offers useful technical depth beyond what’s covered here.
- Where Should Home Security Cameras Be Installed? | Safewise
- Security Camera Placement Guide 2026: Where to Mount for Best Coverage
- CCTV placement advice and checklists – The Independent